Now, it’s time to look at some actual NXC programs. We will start with the traditional first example – a “hello world” program – a program that prints a “hello world” message on the screen. This example will demonstrate the structure of NXC programs, as well as how to compile and run them.
Each program consists of one or more tasks; for example, if a robot is required to drive towards a source of sound, its program may consist of the drive forward and sound sensor data processing tasks. Each NXC program must have at least one task and that task is called “main.” Thus, the most simple NXC program can be written as:
task main()
{}
Every task consists of zero or more functions/instructions. However, no instructions means no actions (as in the above example). NXC is case sensitive, meaning that “this” is not the same as “This” or “THis” or “THIS” , etc. Each instruction in NXC ends with the semicolon (;). We will introduce different instructions/functions/programming rules as we go.
Right now, for the “hello world” program we need a simple function called “TextOut.” It is defined as follows:
TextOut(location_x, location_y, message_text, options)
The NXT™ display is 100px wide (x-axis) and 64px tall (y-axis) and the (0,0) position is in the bottom left corner of the screen. Given this information, we can incorporate the TextOut function in the main task as follows:
task main()
{
TextOut(0, 0, “hello world”);
}
If you write (or copy/paste) this program into a simple text editor and save it as the “helloWorld.nxc” file, you can compile it and transfer it to NXT™brick using the following command:
nbc -$=usb -d helloWorld.nxc
(assuming that the NXT™ brick is on and connected to the computer via USB port, as well as that helloWorld.nxc program is in the same folder as the nbc compiler).
Now, if you go to NXT™ brick and select My Files =>Software Files, you will see the helloWorld program. You click on it and press Run to execute it.
If you have done it, you probably didn’t see the “hello world” message on the screen, as the screen returned to the Software Files. It does not mean that the message did not print out, but that this instruction was executed so fast that we didn’t see it before the program terminated itself. Hence, if we want to see our message, we need to delay the termination of the program. We will do it using the function called Wait(time_in_ms).
We can rewrite our program as:
task main()
{
TextOut(0, 0, “hello world”);
Wait(1000);
}
Now, if we compile and run our program, we well get the following output:
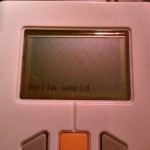
hello world
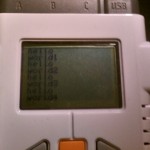
There are alternative ways of using TextOut() and Wait() functions. The following example:
task main()
{
TextOut(0, LCD_LINE1, “hello”);
Wait(SEC_5);
TextOut(0, LCD_LINE2, “world1”);
Wait(SEC_5);
TextOut(0, LCD_LINE3, “hello”);
Wait(SEC_5);
TextOut(0, LCD_LINE4, “world2”);
Wait(SEC_5);
TextOut(0, LCD_LINE5, “hello”);
Wait(SEC_5);
TextOut(0, LCD_LINE6, “world3”);
Wait(SEC_5);
TextOut(0, LCD_LINE7, “hello”);
Wait(SEC_5);
TextOut(0, LCD_LINE8, “world4”);
Wait(SEC_5);
}
will produce the following output: